My HomeLab Set Up
How my 10 year old desktop got a new life
In this post, I’ll walk you through my journey of setting up a homelab using old hardware and the amazing Coolify tool. Whether you’re new to homelabs or looking to breathe new life into old tech, this guide will show you how easy it is to get started and what you can achieve!
The technologies I’ll be somewhat discussing in this post are:
Some Taran History
In another life, I used to work at the Beedie School of Business at the Technical Support Desk. Shout out to Mike Church for giving me the opportunity to work there and for nurturing my passion for technology, you’re a real one 🙏🏽.
Whilst working at Beedie, I was exposed to lots of different things and one of these things was home networking and the concept of a homelab. For those of you who don’t know what a homelab is, it’s like a mini data center that you set up at home. It’s a collection of computers, servers, or other tech gear that lets you experiment, learn, and run different software or services without relying on external providers like Google or Amazon.
When I asked my colleagues to explain the benefits of a homelab, I was told that it’s like having your own personal playground for apps you’d like to try out. For example, maybe you’re wanting to try out your own media streaming app, like Plex, and paying to host that, simply for experimentation kinda feels like a waste of money, since you don’t even know if you’re gonna end up using it regularly. Moreover, having a homelab enables you to own your own data versus hosting stuff on the cloud which is really just other people’s servers lol 😅. For instance, there’s a self-hosted version of Google Drive called NextCloud that you can use to do your own file management and even a self-hosted version of google meet, called jitsi. There’s tons of other self-hosted versions of apps out there — this awesome list has so many!
The Taran Present
So, as you may have guessed, a few years ago, I had a homelab set up for streaming media content from Plex, but it fell to the wayside after I moved. After the move, I was never really that motivated to boot my server back up since I had nothing I really wanted to use it for — everything I wanted to stream was on Netflix or some other streaming provider. My server sat there collecting dust for years… but that all changed after I saw this short by Melkey!
A self-hosted Heroku and Vercel? Yes, please! What’s not to love? I’ve been using fly.io for the past year to host my apps, and I absolutely love it. However, the ability to deploy one-off apps for tinkering or work presentations for free is super dope!
Now don’t get me wrong, Fly (and vercel probalby) has an incredibly generous free tier, doesn’t force you to pay bills that are less that $5 for the month, and mostly awesomely, Fly has accident forgiveness for when you mistakenly rack up a $5000 bill because of a misconfiguration. Fun fact, I racked up a $3000 AWS bill when I worked at a real-estate marketing company 😅. Luckily AWS forgave us after my boss explained how the intern messed up when playing around with hosting wordpress sites.
My Goal
Alright, hopefully you’re still with me after that little word vomit above — which I unironically call ‘context setting’ 😆. Now, let’s dive into my goals for my 2024 homelab.
- Self hosting my media (Plex, etc)
- Self hosting some web apps (like my go and htmx demo, and my nx demo)
- Securely exposing applications on my homelab to the public internet
- Having fun (duh) and learning!
Server Setup
Hardware
I’m running TrueNAS Scale on an AMD A6-5200 APU with Radeon(TM) HD Graphics (circa 2013) with 9GB of RAM. This setup is quite dated by today’s standards, but it’s all I got so we gotta make due. My machine has 1TB of storage space (two hard drives running RAIDZ1), and the OS is running on a 256GB portable SSD.
My current hardware really struggles with media playback and streaming, but it’s fine for hosting my web apps and other services that I want to run from my homelab. If you’re wanting something more robust, I’d recommend getting some newer hadware!
Software
TrueNAS Scale offers robust features for managing your data, but setting up jails can be more complex compared to TrueNAS Core. Jails provide isolated environments similar to Docker but with less overhead. For Docker, volumes act as persistent storage that remains even if the container is stopped or deleted.
Jails are great because they’re pretty simple to setup, easy to maintain, and easy to update. Docker needs to be provisioned in a VM which means we need to specify a dedicated amount of CPU and RAM to give the machine, hurting the overall system if we overprovision said VM.
TrueNAS Scale ships with support for Kubernetes (K8s) and Docker, but I had a rough time figuring out how I could utilize those tools to host a Coolify instance. There’s probably a way to do this with TrueNAS Scale, but after digging around Reddit and Google for a few hours, I came up with squat 🥲. Thankfully, there’s a handy youtube video that shows you how to set up jails with TrueNAS Scale.
The video does a great job walking you through the jail setup and so with this resource in my backpocket, I moved onto settuing up my jails: Dockge and Coolify.
Setting up My Jails
Dockge
With TrueNAS Scale up and running, the next step was to set up my Docker jail. I
wanted to set up a docker jail because I wanted a place isolated from Coolify to
run services like uptime kuma and
adguard home, and obviously
Plex. The video I linked above shows you up to set up
your docker jail but the general gist of it is that you need to set up your
datasets with a docker and jailmaker so that the docker jail can be
provisioned and have a place to mount volumes from the host to the running
docker containers. I just threw a whole bunch of words at you so let me explain.
For Docker, you can think of a volume as a special folder that Docker containers can use to store data. This folder is separate from the container itself, so if you stop or delete the container, the data remains safe and can be used by other containers or even reused if you start a new container. The host is the computer or server that runs Docker. It provides the resources (CPU, memory, storage) that Docker and its containers use to operate. Essentially, the host is the physical or virtual machine where Docker lives and does its work.
For TrueNAS, dataset is a special box or folder within TrueNAS where you can keep files and folders. It’s like a container for your data that can have its own settings and permissions. Datasets help you organize your storage and manage how data is stored and accessed.
As you can tell, there are a few services I want to run from my docker jail.
There are options like portainer available to run
on our docker and k8s services, but I wanted something super simple and
lightweight — hence me going with dockge.
Also, the homie that created the jailmaker tool demoed
dockge in his
youtube video so I figured I’d
give it a go.
Once I set up dockge, I was able to run my Plex instance in a docker
container. That was it. Plex was up and running in a few minutes. The hardest
thing about this process was setting up the data-pools correctly to mount Plex
data to the correct location on my TrueNAS.
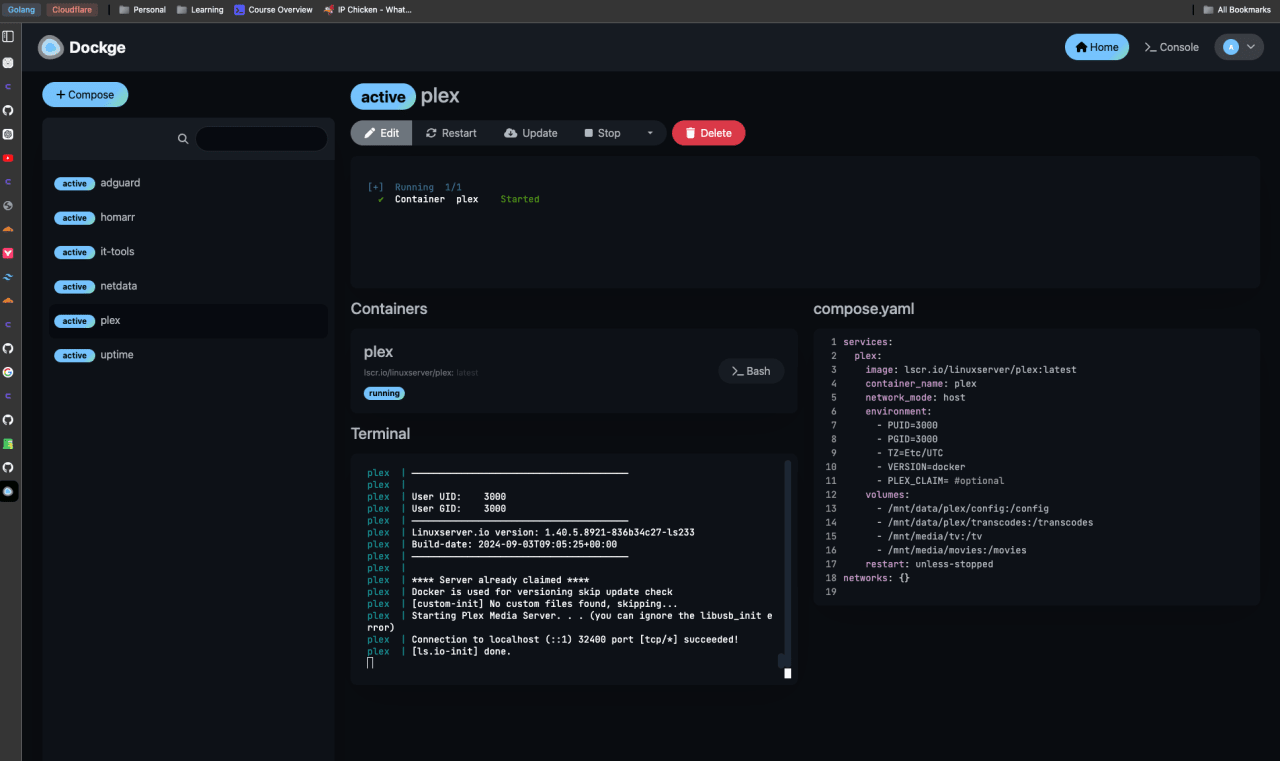
Self hosting my media with Plex ✅! Granted, we’re not able to connect to the server outside of our network… just yet, but let’s talk about setting up Coolify to host my web apps before we get to that.
Coolify Jail
Alright, Docker jail was set up… now it was time for Coolify. The jail setup
process is pretty standard so there was nothing new with the setup step there.
Once that was done, all I had to do was access the jail from the shell and to
install Coolfiy on my NAS via the install command:
curl -fsSL https://cdn.coollabs.io/coolify/install.sh | bash.
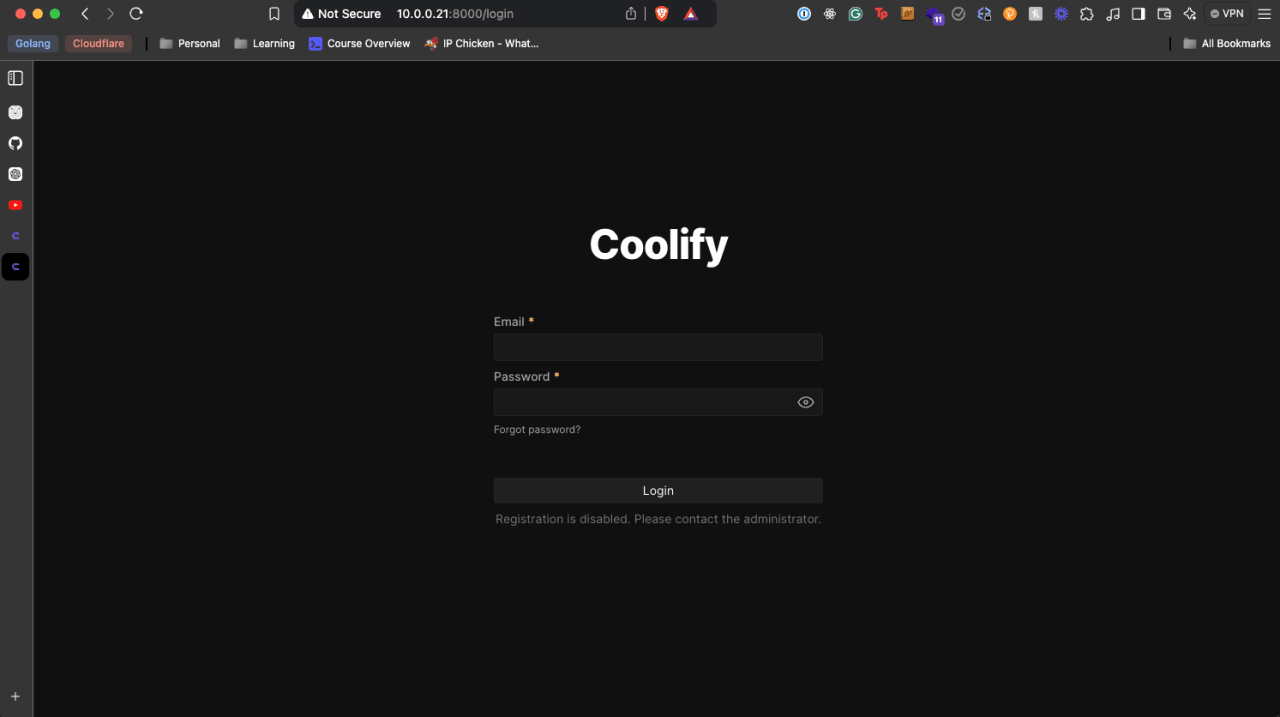
After running through the Coolify installation process, I was able to access
Coolify from within my network by opening up my browser and going to the IP
address that it was assigned by my router. So this was great, I had my NAS up
and running coolify, but I couldn’t access it from outside of my network.
10.0.0.21:8000 was only accessible if you were on the same network as my NAS
😥 so if I was chilling at Starbucks, I couldn’t access my Coolify instance
(which is very important to me) 😅.
Moreover, every time I restarted my NAS, my NAS and Coolify would be assigned new IP addresses 😑. No way I was going to accept this so I put on my networking hat and started working on a solution.
The Internal Networking Setup
It’s recommended to use a wired connection for your NAS, as these connections tend to be more stable and less prone to inteference. Your typical wireless connections can run into issues with other frequencies and devices — my microwave has more than once caused my devices connected via wifi some issues.
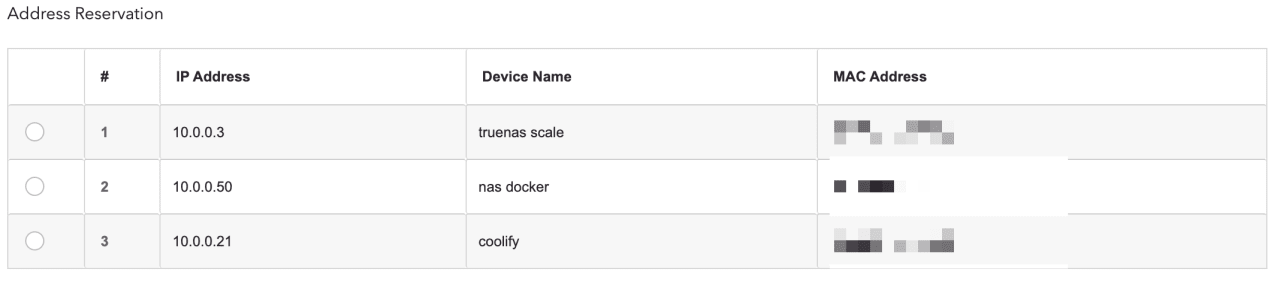
Another important step is setting up a static IP address for your NAS. This ensures that when you reboot your server (which will happen from time to time), it keeps the same IP address. By default, your home router has a built in DHCP server and machines that connect to your network will be given an IP from your router. DHCP is a protocol that allows your router to dynamically assign an IP address to your machines as they pop up and connect to your network. This is great most of the time, but it can cause issues in the case of a reboot (the machine could get a new IP address).
For the case of our NAS, having a static IP address is important because we can easily reconnect to our NAS without needing to manually adjust to a new IP address and any other services/devices that connect to our network will be able to connect to our NAS without issue.
This video does a pretty good job walking you through the steps for configuring a static IP on your typical consumer router!
If you’re interested, my own home network set up is like this:
Hosting Apps on Coolify
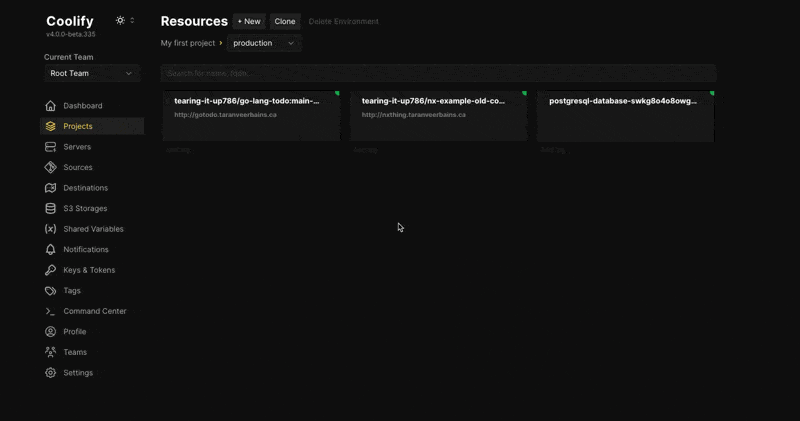
I’m not joking when I say that it’s super easy to host apps on Coolify. I was
able to host my
go and htmx demo and my
nx demo on Coolify in a
matter of minutes. One of these is a Go server and the other is client side
React app.
There were some tweaks that I had to make to get my React app to work; the main
one being, I had to create a Dockerfile!
While Coolify will use Nixpack to build your
app if there isn’t a Dockerfile present, I found that it took way longer to
build than when I used my own Dockerfile. Here’s a small example of how easy
it is to connect Coolify to a github project and deploy it to your instance!
So now, I was able to to go to 10.0.0.21:7860 and see my app running! But,
wait, you might say. How the heck were you able to get to
yolo.taranveerbains.ca? I swear (well at least for now) I am indeed able to
hit https://yolo.taranveerbains.ca and see my app running! Let’s get into
exposing my apps. This is SFW I swear 😆!
Cloudflare Tunnels to the Rescue
If you’re already using Cloudflare, you can use their Tunnels to expose your
apps to the public internet. My primary domain — taranveerbains.ca — is
using Cloudflare’s nameservers and so I’m already a part of their network and
could benefit from their Tunnels.
With a Tunnel, we don’t actually send any traffic to an external IP. A
lightweight daemon (cloudflared) is running on your server and creates
outbound connections to Cloudflare’s network. This is awesome because it means
that our servers can serve traffic through Cloudflare without being vulnerable
to attacks that bypass Cloudflare’s network.
Granted, this is locking me down to Cloudflare’s network, but I’m not going to worry about that for now since, like I said above, the whole purpose of my homelab is to be able to run my own apps and services for the purposes of experimentation and learning! If you’re wanting to not get locked down into Cloudflare, you can check out awesome-tunneling and explore other tunneling options! I think one of the more popular options is frp but to be frank, it seems way more complicated to set up and Coolify provides a guide on how to set up Cloudflare Tunnels… so we’re gonna stick with that for now.
So, back to Cloudflare Tunnels… how exactly does this work? I’m glad you asked! And you can bet dollars to donuts that I made a mermaid diagram to help you understand 🧜🏽♀️!
HTTP Request Flow for Yolo.Taranveerbains.Ca
Cloudflare has some great docs on their Tunnels that explain how the underlying technology works. I’ve included the diagram below that explains my understaning of the setup — note that it only covers the general gist of how the Tunnel works.
sequenceDiagram
    Actor User
    participant Cloudflare
    participant CloudflareTunnel
    participant MyCoolify

    User->>Cloudflare: HTTP req to yolo.taranveerbains.ca
    Cloudflare->>CloudflareTunnel: HTTP req to yolo.taranveerbains.ca
    CloudflareTunnel->>MyCoolify: HTTP req to yolo.taranveerbains.ca
Okay so we’ve got a decent understanding of how the tunnels work, but how do we actually use them with Coolify? Suprisingly, it’s super easy and straightforward 🤯!
Installing Cloudflared on Coolify
Did you know that Coolify has some pretty great docs 🔥! They have a knowledge
base article on
how to install cloudflare tunnels
that walks you through the steps to install cloudflared on Coolify.
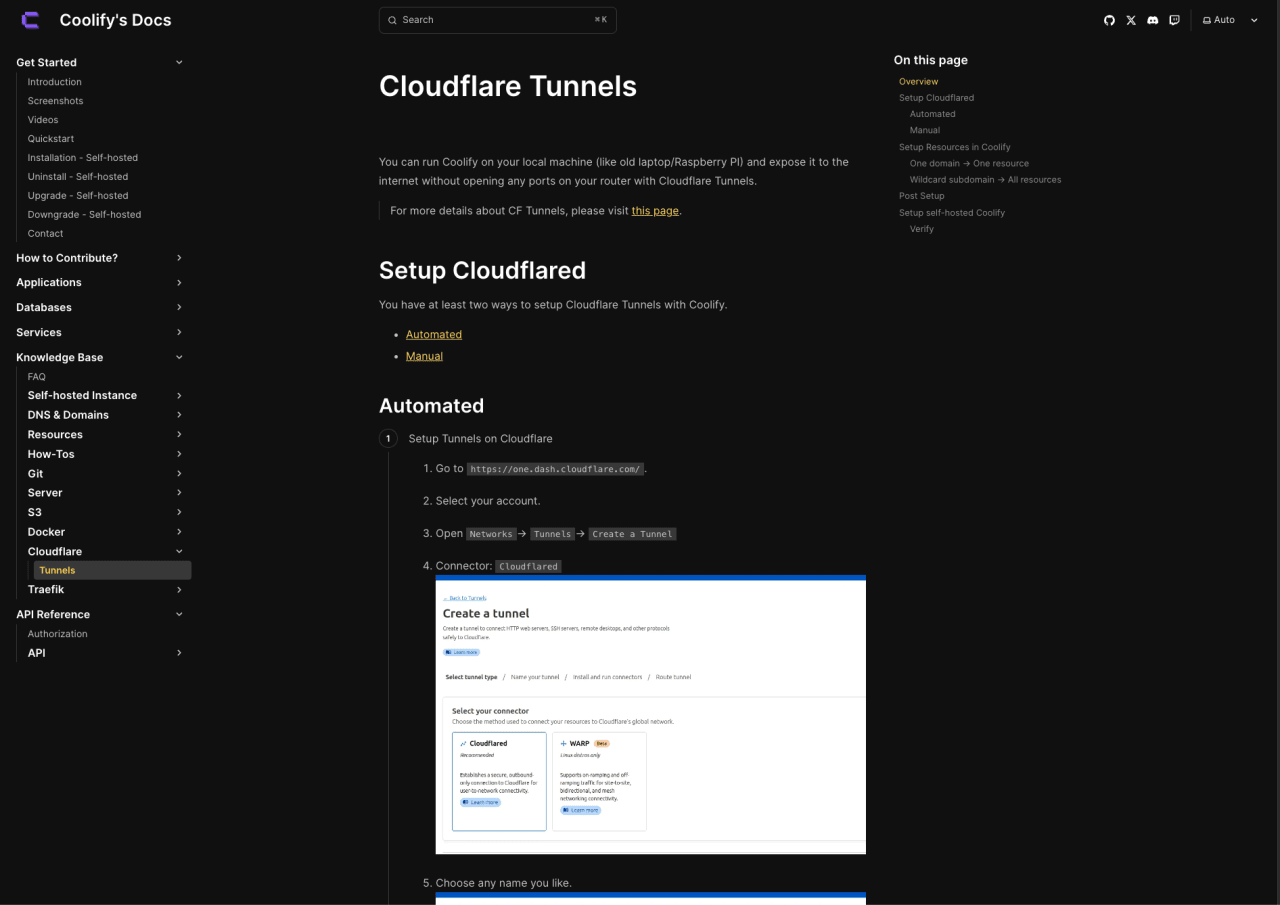
For my server, I first attemped to do the one domain -> one resource setup but
ended up going with the wildcard subdomain -> all resources after I ran into
some issues. I ended up having to go the wildcard route for my setup because I
noticed that if I tried to install
services like
uptime kuma with Coolify and didn’t
specify a domain name, Coolify would error out with a message like:
fqdn error: fqdn must be unqique. After switching to the wildcard method, I
had to specify the domain for each service inside of my Coolify instance if I
wanted to expose it to the public internet(which you have to do anyways from
Cloudflare if you do the one domain -> one resource setup).
That’s basically it 😅. Follow the guide on the Coolify docs and you’re off to the races 🏎 🏁!
Closing Thoughts
In closing, setting up a homelab has been an incredibly rewarding experience. Not only has it allowed me to breathe new life into old hardware, but it has also given me a playground for experimenting with self-hosted solutions and learning more about networking, containers, and cloud alternatives. Whether you’re looking to secure your own media, run personal web apps, or simply tinker and learn, a homelab offers a unique hands-on opportunity. Plus, the sense of ownership over your own data is freaking sick.
If you’re thinking about building your own homelab, don’t be discouraged by older hardware or potential technical challenges. There’s a wealth of resources and a community of enthusiasts to help along the way. Dive in, experiment, and enjoy the process—you never know what you might create or discover!
If you have any questions or comments, feel free to reach out to me on Twitter or LinkedIn.
Grateful you spent some time here.